[单选题]
如图所示,并联长管1、2、3,A、B之问的水头损失为()。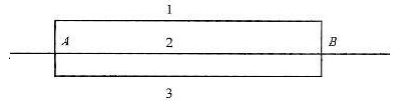
A.hfAB=Hf1=hf2=hf3
B.hfAB=hf1+hf2+hf3
C.hfAB=hf1+hf2
D.hfAB=hf2+hf3
参考答案与解析:
-
相关试题
-
如图所示,其中箭头b所指的结构为()<img border="0" style="width: 532px; height: 399px;" src=&q
-
[单选题]如图所示,其中箭头b所指的结构为()A.中央动脉B.中央静脉C.小叶间动脉D.小叶间静脉E.小叶间胆管
- 查看答案
-
图所示,并联长管1、2、3,A、B之间的水头损失为()。<img border="0" style="width: 547px; height: 158px;&qu
-
[单选题]图所示,并联长管1、2、3,A、B之间的水头损失为()。A.hfAB=hf1=hf2=hf3B.hfAB=hf1+hf2+hf3C.hfAB=hf1+
- 查看答案
-
图所示,串联长管1、2、3,A、B之间的水头损失为()。<img border="0" style="width: 535px; height: 34px;&quo
-
[单选题]图所示,串联长管1、2、3,A、B之间的水头损失为()。A.hfAB=hf1=hf2=hf3B.hfAB=hf1+hf2+hf3C.hfAB=hf1+
- 查看答案
-
如图所示,可能性最小的诊断是()<img border="0" style="width: 143px; height: 107px;" src=&quo
-
[单选题]如图所示,可能性最小的诊断是()A.骨瘤B.骨肉瘤C.陈旧性外伤D.外生骨疣E.以上都不是
- 查看答案
-
<img border="0" style="width: 399px; height: 17px;" src="https://img.zha
-
[单选题]( ).A.0B.1C.2D.3
- 查看答案
-
<img border="0" style="width: 399px; height: 17px;" src="https://img.zha
-
[单选题]( ).A.0B.1C.2D.3
- 查看答案
-
<img border="0" style="width: 399px; height: 28px;" src="https://img.zha
-
[单选题]A.B.axC.aD.ayE.xy
- 查看答案
-
<img border="0" style="width: 399px; height: 28px;" src="https://img.zha
-
[单选题]A.B.axC.aD.ayE.xy
- 查看答案
。<img border=\"0\" style=\"width: 399px; height: 107px;&q")